
Navigating the intricacies of npm packages can be a puzzle. We also understand this at funda, which is why Software Engineer Ariadine Gomes shares her insights about this in her blog post. Discover her 5 practical ways to simplify your package management journey.
Complexity of npm packages
If you have been working with Node Package Manager (npm) packages for some time, you know how complex it can get. This is what we have experienced as well. I have been at funda for five years, and have worked with npm packages before too, but things keep changing, and managing them can still be a challenge sometimes. But getting hands-on with funda's multitude of packages, and watching that number grow every day, has given us insights into both the advantages and challenges it brings.
Just check the closest package.json file you come across; you might see there is a lot going on. It is there where the package name can be defined, where the current versions and appropriate bundler can be set, and where you decide which scripts are going to run and where it will be published.
Moreover, there is the challenge of ensuring that your isomorphic/universal JavaScript (do we still call it that these days?) is bundled correctly, and that package.json has been properly configured with “node” and “browser” export fields. If you need to support both CommonJS and ES Modules, you will have to deal with the "import" and "require" fields as well – not to mention documentation for changes, release processes, and dependency updates adding more layers of complexity.
Fun times, right? :)
Though it may be hard to completely avoid complexity, let us focus on how we can simplify our developers' lives. At funda, we have put into practice some things to help manage packages and make it a bit less painful. Here are my five tips based upon my experience to simplify your npm package management:
1. Simplifying complexity
We decided to stop supporting CommonJS for the more recent packages, since most of our packages are private. ES Modules are natively supported in modern browsers and Node.js supports it with version 13.x or higher (LTS version is now 18). Sometimes updating the node version of the project that depends on your packages is easier than maintaining legacy support on the packages.
If all your projects are using Typescript, it is also possible to simplify it by exporting the raw .ts file. Basically, you can reduce the upfront prep work and postpone compiling, bundling, transpiling or minifying to run when the packages are installed. As a bonus, this can help with the debugging process.
Before (filename: package.json):
{
  "name": "name-package",
  "version": "1.0.0",
  "exports": {
    ".": {
      "types": "./dist/index.d.ts",
      "require": "./dist/index.cjs",
      "import": "./dist/index.mjs"
    },
    "./other": {
      "types": "./dist/other.d.ts",
      "browser": {
        "import": "./dist/other.cjs",
        "require": "./dist/other.mjs"
      }
    }
  },
  "files": [
    "./dist"
  ],
  "scripts": {
    "prepublishOnly": "rollup --config rollup.config.ts --configPlugin typescript"
  },
  "devDependencies": {
    "@rollup/plugin-typescript": "^11.1.3",
    "rollup": "^3.28.1",
    "tslib": "^2.6.2",
    "typescript": "^5.2.2"
  }
}
After (filename: package.json):
{
"name": "name-package",
"version": "2.0.0",
"exports": {
".": "./index.ts",
"./other": "./other.ts"
}
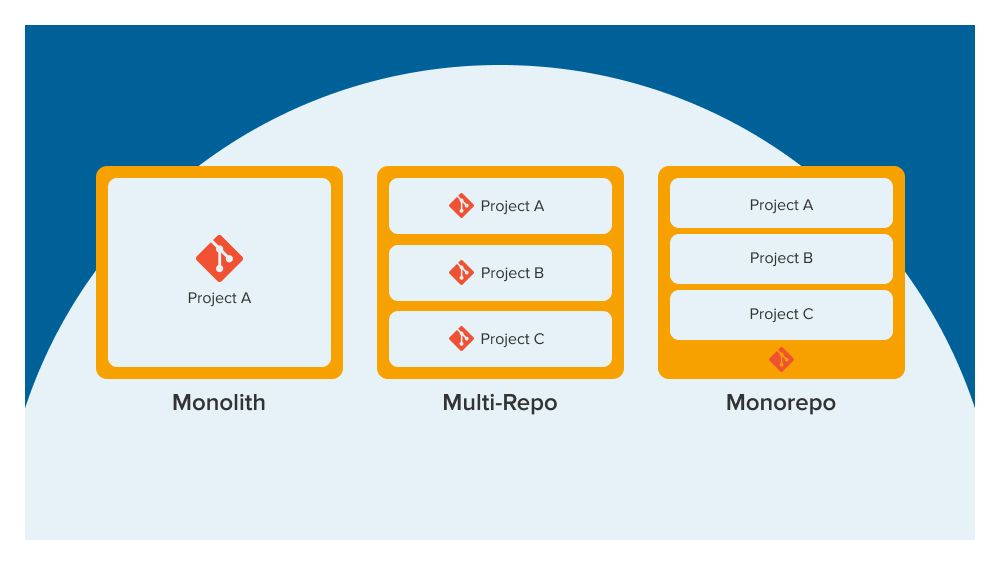
}2. Monorepos
We have some packages with sub-packages and cross dependencies. Keeping these in separate repositories can be overwhelming sometimes. Monorepos are a great way to get better release management, while also simplifying sharing and refactoring code. Of course, they might lead to some discussions on defining the code owners and directory structure.
For some other challenges we had for the initial setup, we opted to use monorepos to help us. Besides sharing and refactoring code, monorepos can simplify development in general, in terms of making atomic changes, making testing easier and having more consistent versioning across packages.
3. Automating releases
Releasing a package can be done manually, but there are also a lot of tools that can help automate it. We use Github Actions together with changesets (for monorepos) and semantic-release (for single packages) to automate the release process of packages. Every time a pull request is merged to the main branch, an action will take care of defining the version, updating the changelog, creating the tags, and updating cross dependencies and package releases.
Read also: Unleashing the potential: the importance of mastering Git
Example with single packages
Filename: .github/workflows/release.yml
name: Release on push to main, master alpha, beta, next, next-major
on:
  workflow_call:
    inputs:
      path:
      required: true
      type: string
permissions:
  contents: write
  packages: write
jobs:
  release:
    name: Release
    if: ${{ github.ref == 'refs/heads/main' || github.ref == 'refs/heads/master' || github.ref == 'refs/heads/alpha' || github.ref == 'refs/heads/beta' || github.ref == 'refs/heads/next' || github.ref == 'refs/heads/next-major' }}
    runs-on: ubuntu-latest
    defaults:
      run:
        working-directory: ${{ inputs.path }}
    steps:
      - name: Generate token
        id: generate_token
        uses: tibdex/github-app-token@v1
        with:
          app_id: ${{ secrets.SEMANTIC_RELEASES_APP_ID }}
          private_key: ${{ secrets.SEMANTIC_RELEASES_PRIVATE_KEY }}
      - name: Check out source code
        uses: actions/checkout@v3
        with:
          fetch-depth: 0
          persist-credentials: false
       - name: Set up node version
         uses:
         with:
           node-version-file: "${{ inputs.path }}.nvmrc"
       - name: Create .npmrc
         run: |
           cat << EOF > "$HOME/.npmrc"
           //npm.pkg.github.com/:_authToken=$GITHUB_TOKEN
           EOF
         env:
           GITHUB_TOKEN: ${{ secrets.GITHUB_TOKEN }}
        - name: Install dependencies
          run: npm ci
        - name: Release
          run: npx semantic-release
          env:
            GITHUB_TOKEN: ${{ steps.generate_token.outputs.token }}
            NPM_TOKEN: ${{ secrets.GITHUB_TOKEN }}
Example with a monorepo
Filename: .github/workflows/release.yml
name: Release
on:
  push:
  branches:
    - main
  jobs:
    release:
      name: Release
      runs-on: ubuntu-latest
      env:
        GITHUB_TOKEN: ${{ secrets.GITHUB_TOKEN }}
        NPM_TOKEN: ${{ secrets.GITHUB_TOKEN }}
    steps:
      - name: Checkout
        uses: actions/checkout@v3
      - name: Install dependencies
        run: npm ci
      - name: Create Release Pull Request
        uses: changesets/action@v1
        with:
          commit: Update packages versions
          title: New release
          publish: npm run release
        env:
          GITHUB_TOKEN: ${{ secrets.GITHUB_TOKEN }}
4. Automating updates
We also use Dependabot to check for outdated dependencies and open pull requests automatically. Using it combined with Github Actions, we can automatically merge if it is just a patch or minor update on the package version. Just make sure that you have good test coverage and only allow merging if it passes the tests.
This is how to set a dependabot schedule.
Below is an example of using the dependabot. The first piece of code says how often it will search for updates and the second piece of code automates the updates.
Filename dependabot setup: .github/dependabot.yml
 version: 2
updates:
- package-ecosystem: npm
  directory: "/"
  versioning-strategy: increase
  schedule:
    interval: daily
Filename dependabot automerging: .github/workflows/ci.yml
name: On pull requests
on:
  workflow_call:
    inputs:
      path:
        required: true
        type: string
jobs:
  test:
    runs-on: ubuntu-latest
    defaults:
      run:
        working-directory: ${{ inputs.path }}
    env:
      GITHUB_TOKEN: ${{ secrets.GITHUB_TOKEN }}
    steps:
      - name: Check out source code
        uses: actions/checkout@v3
      - name: Set up node version
        uses: actions/setup-node@v3
        with:
          node-version-file: "${{ inputs.path }}.nvmrc"
      - name: Create .npmrc
        run: |
          cat << EOF > "$HOME/.npmrc"
          //npm.pkg.github.com/:_authToken=$GITHUB_TOKEN
          EOF
      - name: Install dependencies
        run: npm ci
      - name: Build
        run: npm run build
      - name: Run tests
        run: npm run test
  automerge:
    needs: [test]
    runs-on: ubuntu-latest
    permissions:
      pull-requests: write
      contents: write
    steps:
      - name: Automerge dependabot minor versions
        uses: fastify/github-action-merge-dependabot@v3
        with:
          target: minor
          merge-method: rebase
          github-token: ${{ secrets.GITHUB_TOKEN }}
5. Templates
Finally, once we defined all the setup, tools and continuous integration (ci) actions that worked for us, we created new templates. In these templates, together with our Backstage docs, is where we can all find the latest changes and decisions on the packages (you may have read this before on Golden Paths). This way, when anyone needs to create a new package, it is just a few clicks away.
Et voilà, you have created a new package!
Result
With a well-organized setup and automation in place, package management becomes a lot easier. As a result, our developers have more time to dedicate to their core tasks.
However, it is essential to remember that managing packages, even with automation, comes with some overheads. Some solutions presented here may be effective primarily due to our focus on private packages rather than open-source ones, because with private packages we can make decisions much quicker by just consulting with our own teams.
In any case we should ensure that the benefits of creating a new package are worth the effort required for its maintenance.
See also: How Golden Paths give our developers more time to actually develop
This blog post draws its inspiration from a recent talk I delivered at one of our engaging funda meetups. If you're eager to be part of the next insightful session, be sure to stay tuned to funda's LinkedIn page for updates. Additionally, if you're interested in delving deeper into the content of my presentation, you can find it on my SpeakerDeck.
