
Funda generates a significant portion of its revenue, around 15-20%, through Display Advertising. Lars Douwe Schuitema, both Front-End Developer and Scrum Master, sheds light on the newly built Advertising UI library and how it facilitates display advertising.
Moving Display Advertising to a separate library
One year ago, Team Search went on a mission to rebuild the funda search experience. The existing website was a monolith, but with the introduction of the Lighthouse Architecture, we decided to take a different approach and create a microservice specifically for the new search. As part of the new search project, we needed to incorporate Display Advertising as one of the essential features.
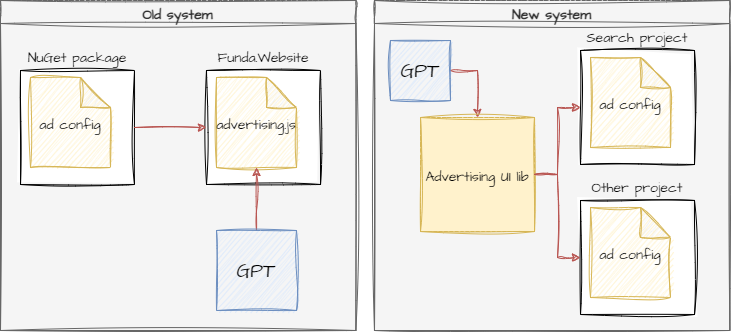
Historically this feature lived in two places. One location, a JavaScript file that was part of the funda website monolith, was responsible for loading the Google Publisher Tags (GPT) library and controlling the advertisements. The other, a NuGet package consumed by the same monolith, dealt with the configuration for each specific advertisement position.
For the new search experience, we opted for a different approach by moving the Advertising implementation, responsible for loading GPT and controlling the advertisements, outside of the project as a library. This way, other projects that require Display Advertising can also benefit from it. And to promote team autonomy, the ad configuration no longer lives in a separate package, but each configuration manages their own project-specific configuration.
Managing ad positions in Google Ad Manager
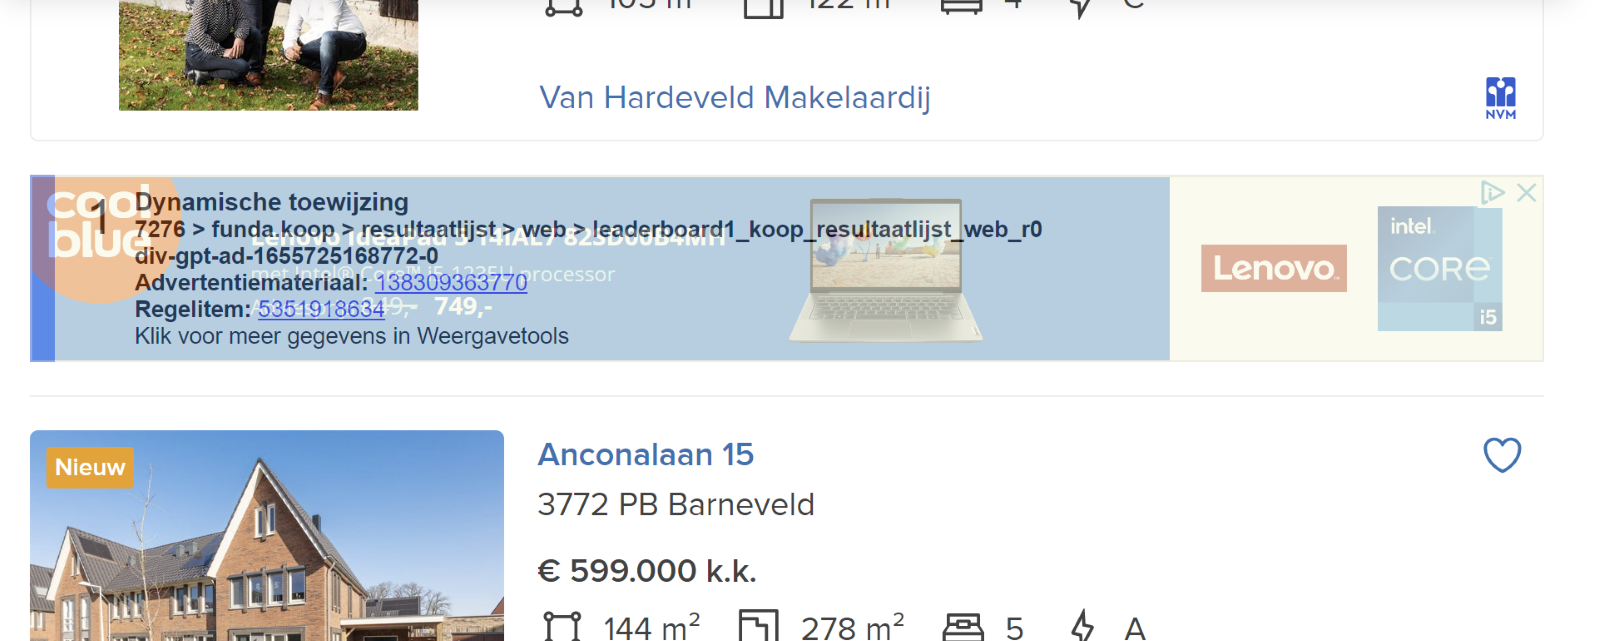
The image below displays an ad placement on the updated funda search interface, known as the 'leaderboard'. Each advertisement visible on the funda website is a distinct placement, defined within the Google Ad Manager platform where all ads are managed. At funda, Yield Managers belonging to the advertising team handle the ad management. Developers can leverage the Google Ad Manager platform to find relevant settings for ad positions defined in their respective projects.

Connection with Google Ad Manager
The Advertising UI library has several key responsibilities, including loading the GPT library, exposing GPT commands and options, and dynamically loading the script based on project-specific use cases. For example, the library can avoid loading the GTP script when the user has declined advertising-specific cookies. GPT is a crucial library that enables the connection with the Google Ad Manager inventory, builds ad requests, and displays ads on a page. To establish this connection, several steps must be taken at the project level:
- Loading the Advertising UI library in the project
- Defining and setting ad position configuration
- Defining and setting global ad configuration
- Displaying an ad position
The Advertising UI library is a Nuxt plugin. To add this library to a project, you simply add it to the plugins array inside the nuxt.config.js file.
Defining ad position configuration
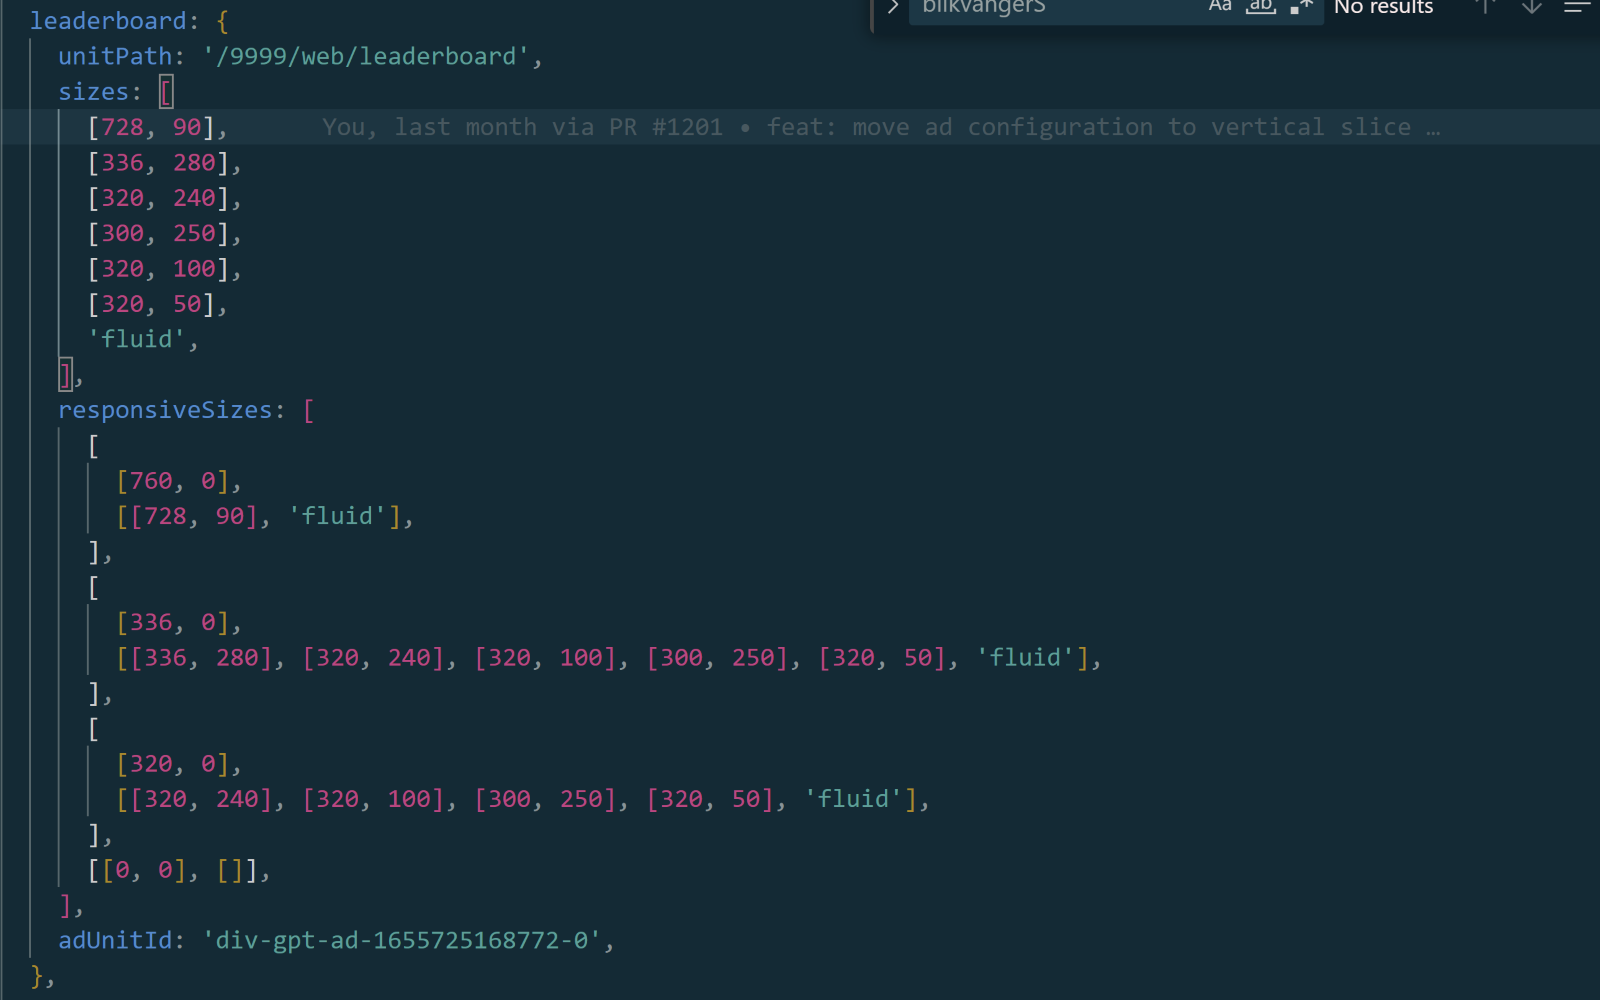
The ad configuration consists of all the ad positions required by the project, including the settings for each uniquely defined ad position (ad unit path, sizes, responsive sizes, ad unit ID).
The ad unit path is a unique string which includes the Google Ad Manager’s network code and is responsible for making the connection between the ad position and the ad management platform.
The ad unit ID is a string required to match the ad configuration with the HTML element on the page. The sizes and responsive sizes determine what ad position sizes are supported and on which screen sizes to display them.
Since this configuration lives on the project level (e.g. search project), every project will have to create and manage their own ad configuration. This introduces team autonomy, because every project requires different ad positions, and each ad position usually has a unique configuration to optimise revenue for that specific position. It also prevents engineers from having to go through a tedious CI/CD process due to having to update both the Advertising UI library and the project consuming the library for every change to the configuration.
See also: Game changer: the benefits of having a lighthouse architecture
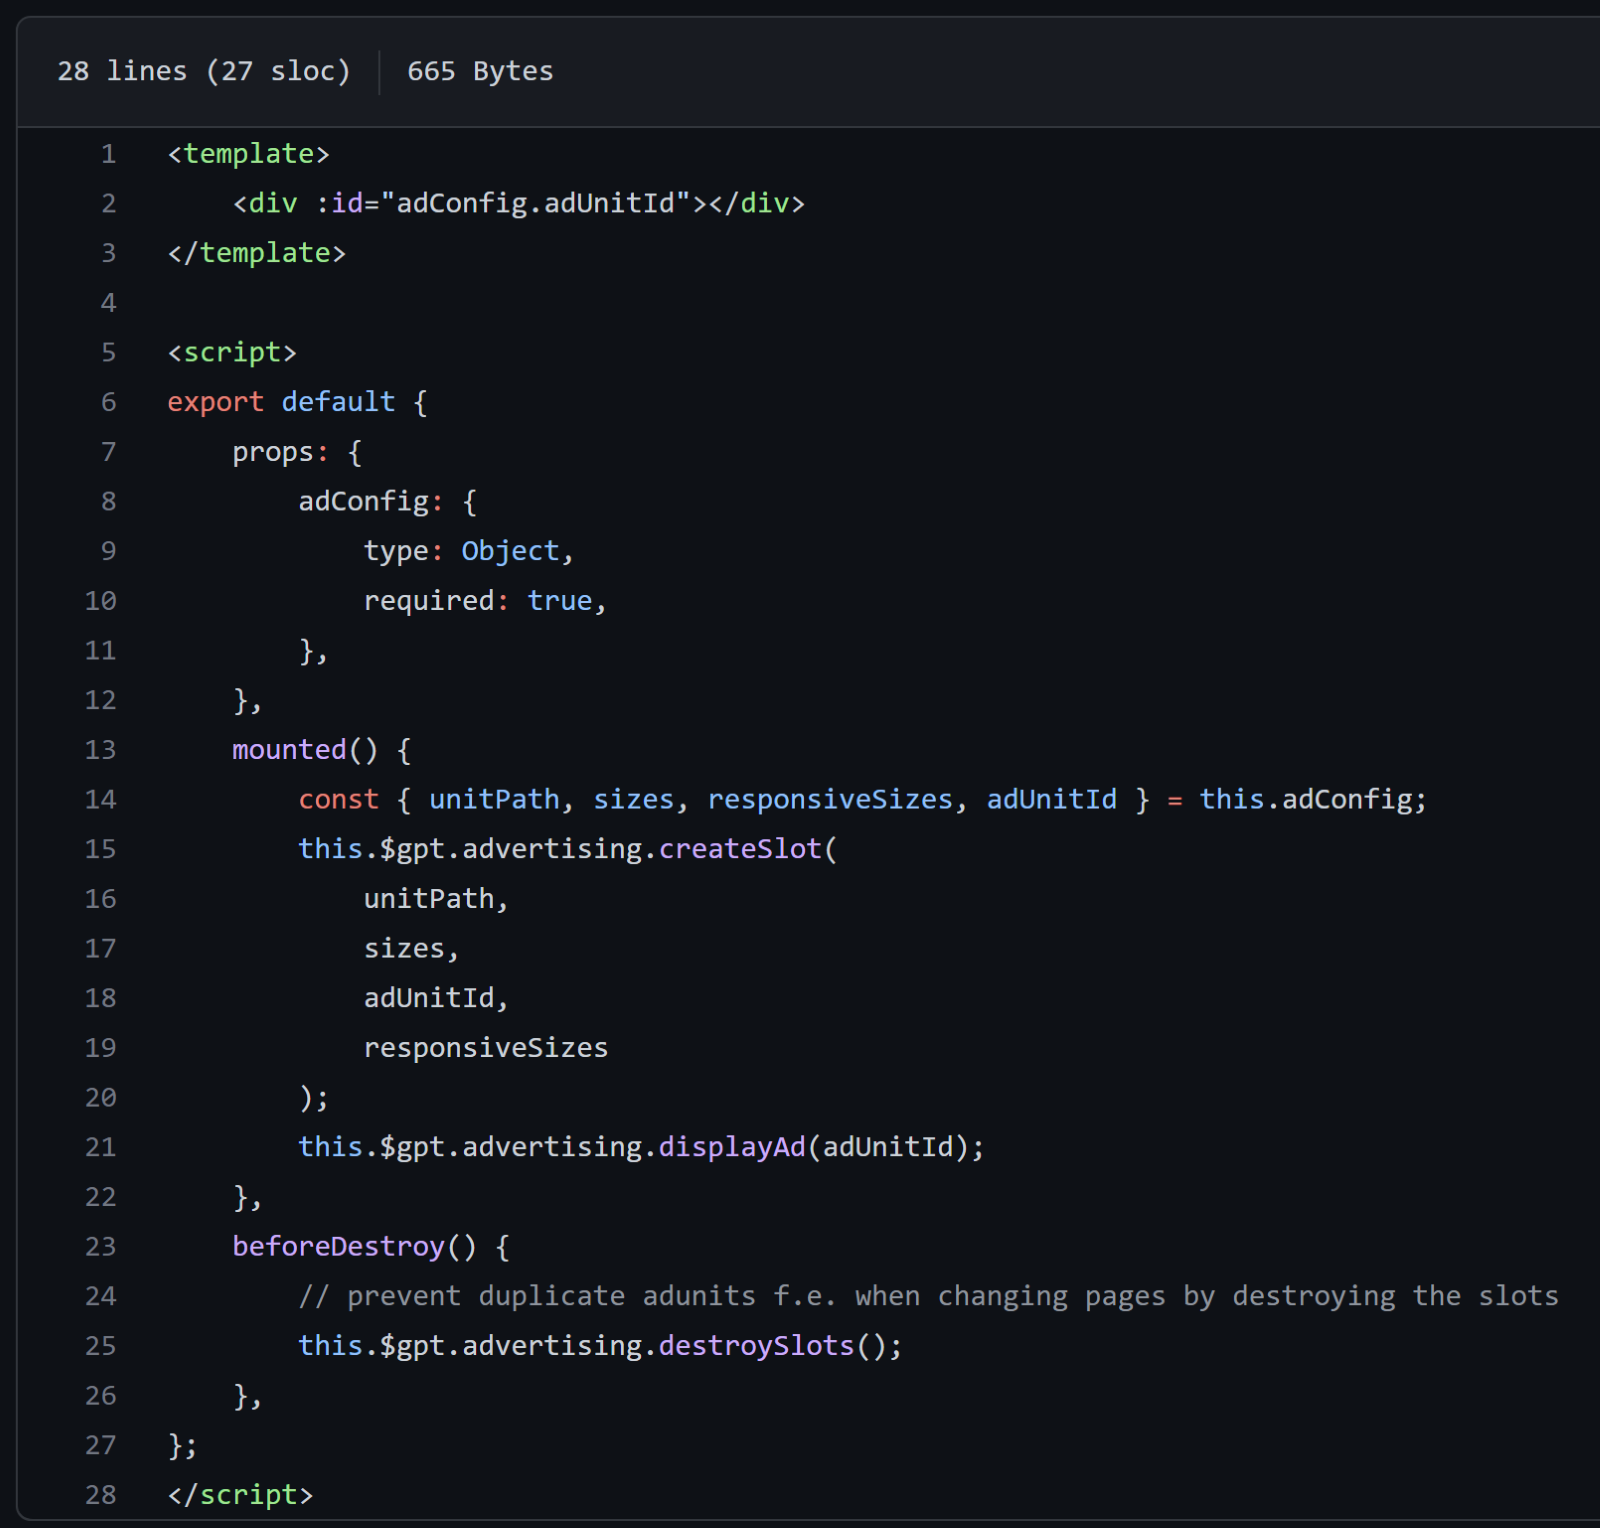
The ad configuration specific to a unique ad position is used in the “AdvertisementView” UI component. This is a reusable component that determines where on the page you wish to render the ad position. A slot is created using the unique ad position’s configuration as an argument, and then displayed. Before the component is destroyed, we destroy the slot to ensure we are not rendering the ad position twice.
Defining global ad configuration
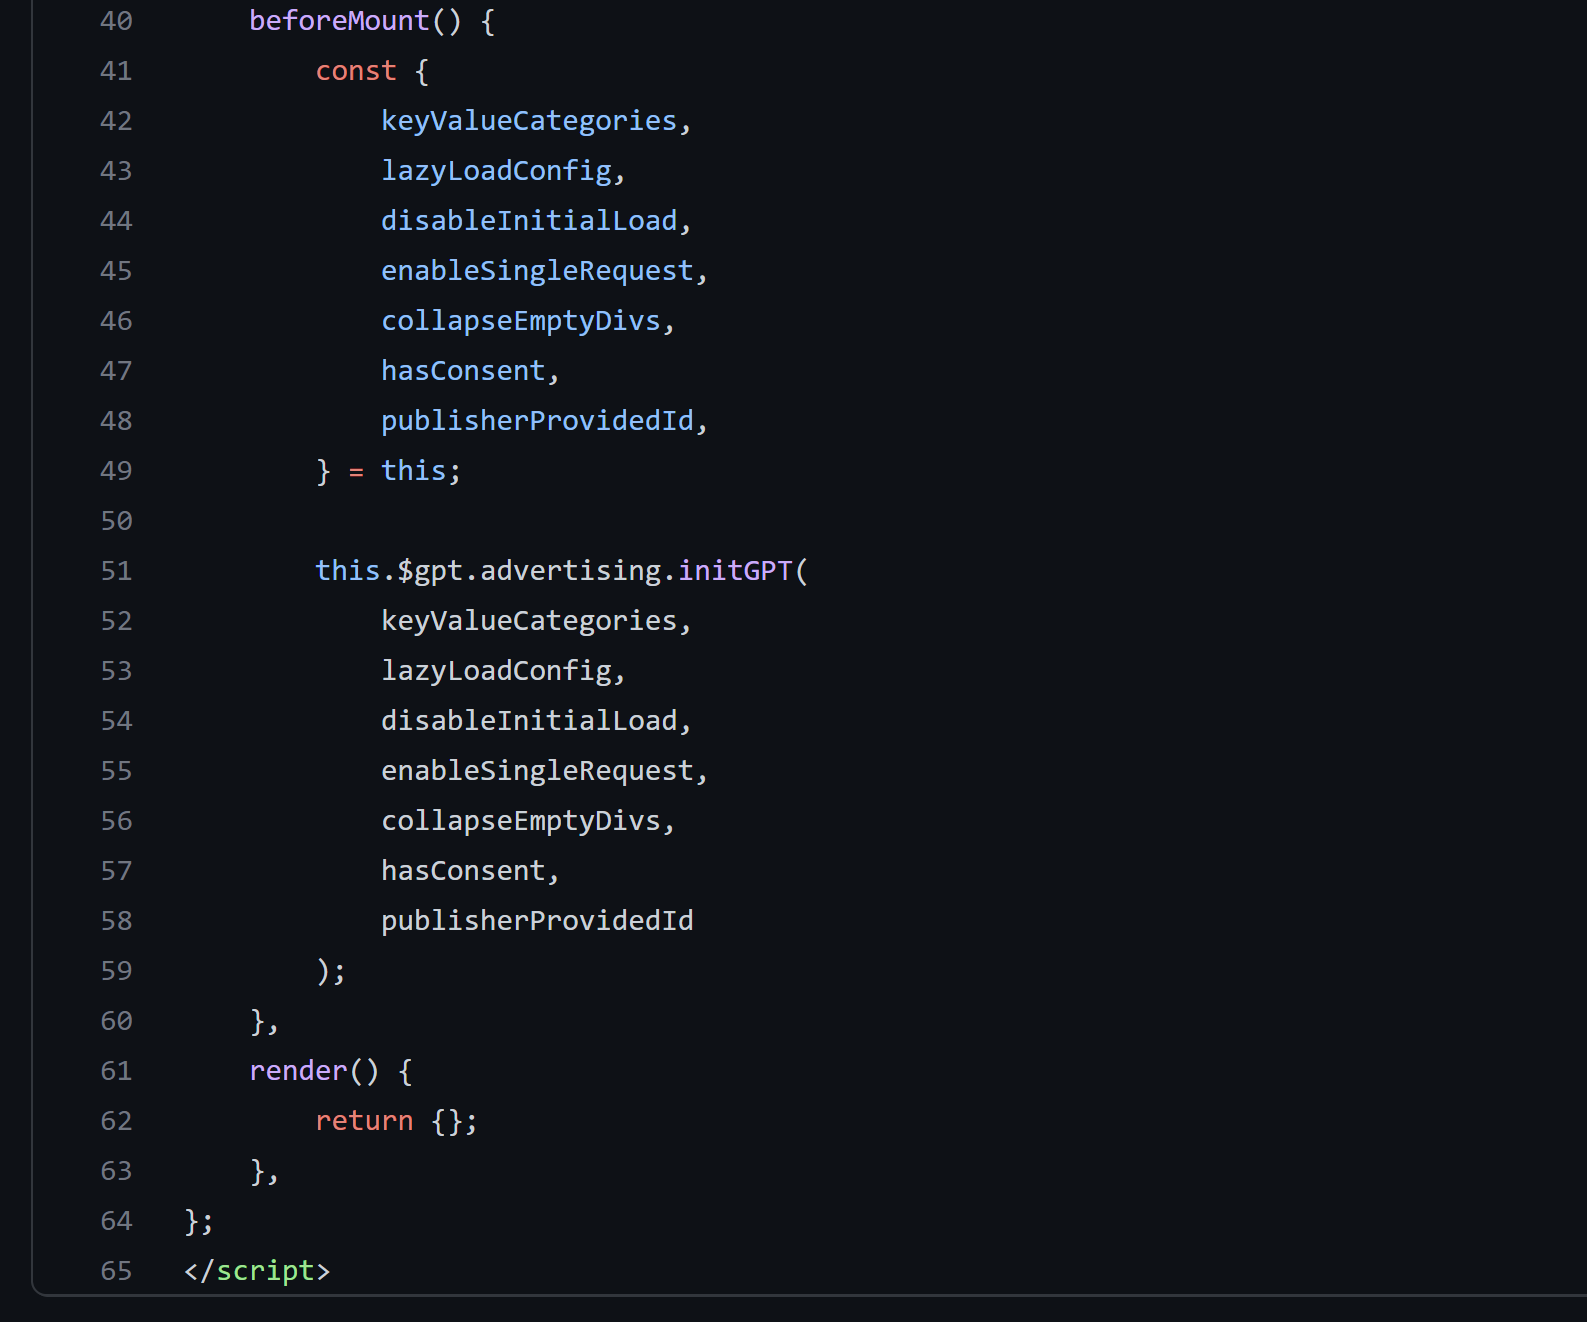
We have a configuration specific to unique ad positions, but we also have a global configuration. These are properties that apply to the entire advertising implementation in a project. Some examples are: Lazy loading, PPID’s (Publisher Provided Identifiers) and page-level Key-value categories.
This configuration, which is similar to the ad specific configuration defined on the project level (e.g. search project) to promote team autonomy, is passed down to the “AdvertisementBase” UI component. This component initialises Google Publisher Tags right before the component Is mounted using the initGPT method. This is a method defined in the Advertising UI library that handles all the global configuration parameters it receives. Most of these parameters deal with commands or configurations known to GPT, e.g. enabling and configuring lazy loading.
Displaying an ad position
Now that we have loaded the GPT library and handled the configuration, we can render the AdvertisementBase UI component and AdvertisementView UI component to display the ad.
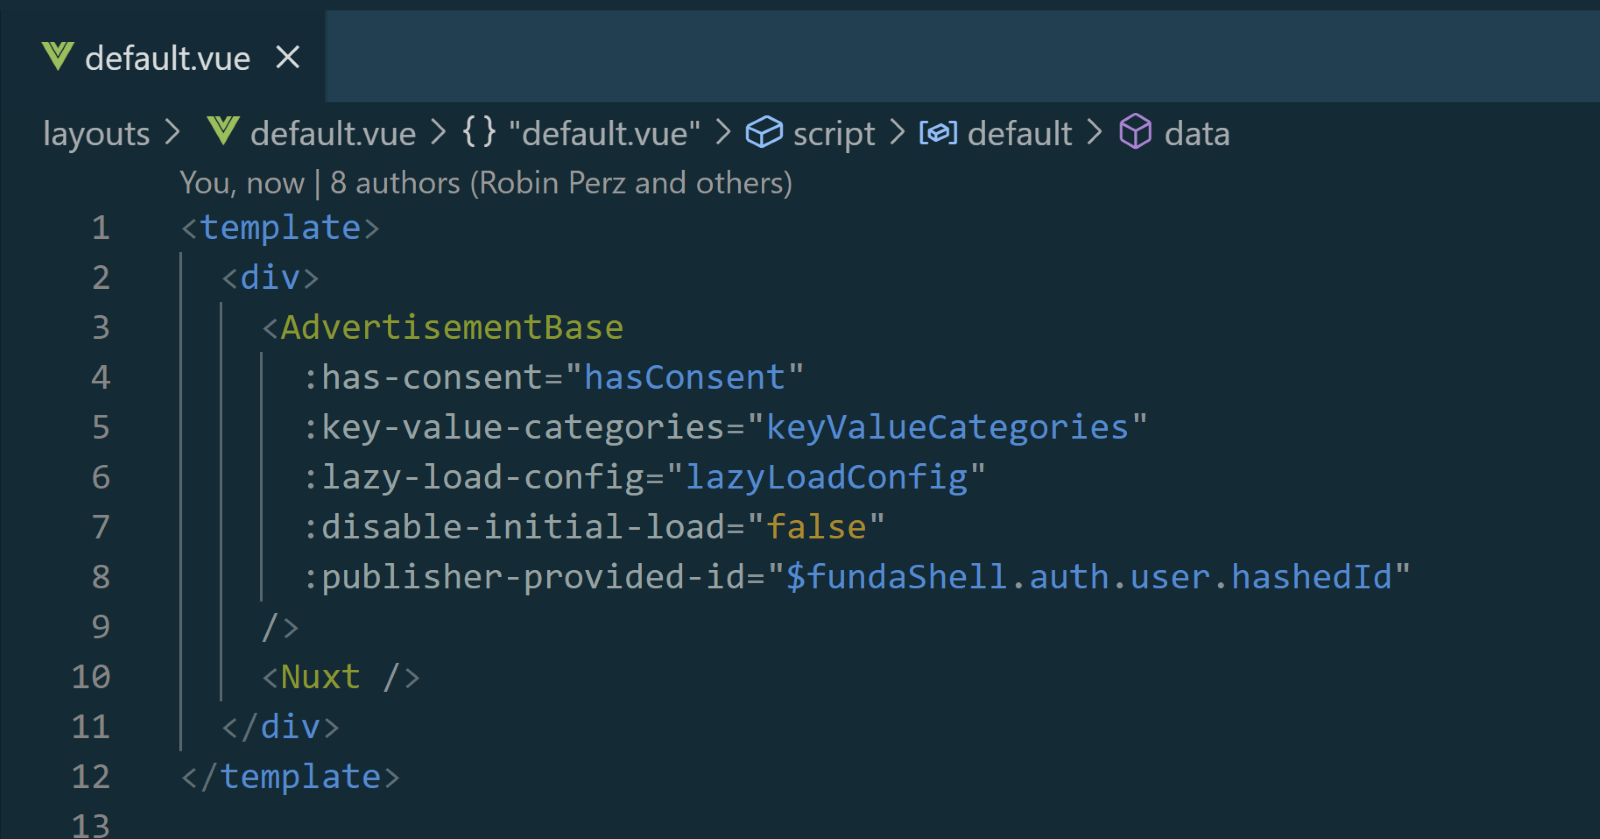
The AdvertisementBase component is usually set in the default layout of a Nuxt application, so that you can load the advertising implementation only once for all pages. In case you do not have advertising positions on all pages, you can move this component into a page component specific to the page you want your advertisements to be displayed.
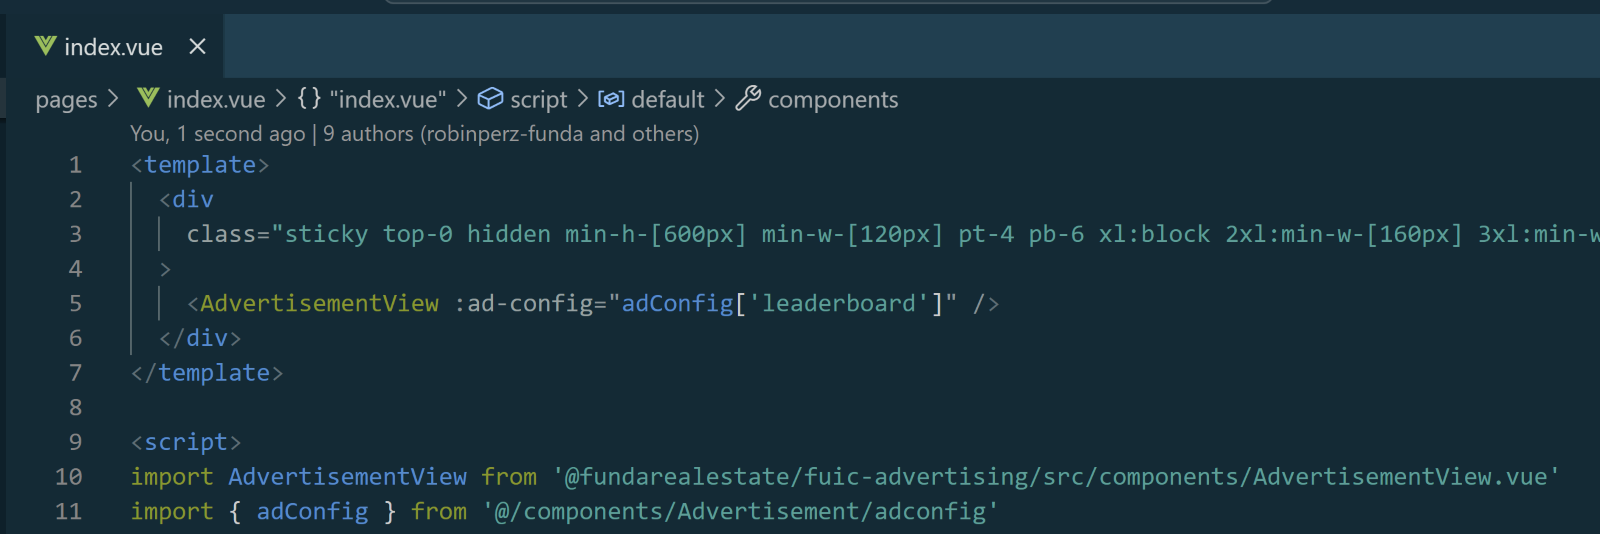
Once you have added your AdvertisementBase component, you should add an AdvertisementView component. The location of this component depends on where you want your ad to be displayed. Once we have imported the component and determined where in the template tag we want to render the component, we can pass down the ad configuration that belongs to the ad position. A reminder: this configuration is defined in your ad configuration. However, if you only have only a single ad, you could also specify the configuration directly in your component’s file.
In the search project we have decided to create a single ad position configuration file with all the ad positions using a tree of objects. We can then grab the specific ad using its unique name.
Using Google Publisher Console to test our ad position
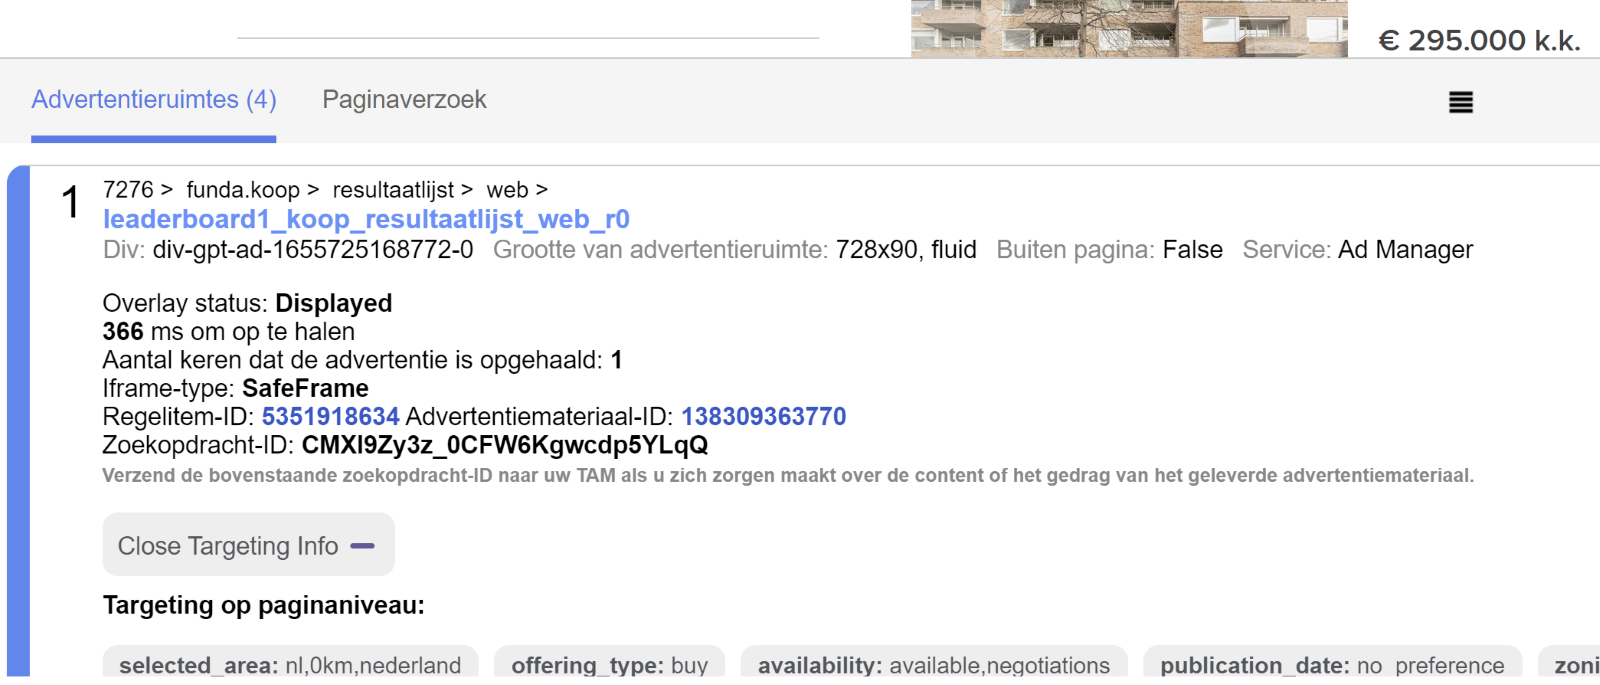
Now that we have everything in place, we should see an ad. However, to be sure that our ad position is showing the correct ad, we can use the Google Publisher Console to test the implementation. Open the console using the bookmark or any other method and inspect the details. We verify that the ad unit path, ad unit id and ad sizes are correct. The sizes may change depending on your screen size. To test whether the sizes match with the responsive sizes, as set in the ad configuration, we can use Google Devtools.
Besides testing the ad specific configuration, we can also test our global ad configuration. For example, we can check whether our lazy loading is working by seeing “the number of times our ad has been requested”, or we can inspect which key-value categories have been added on page level by pressing “Open targeting info”.
How other projects can benefit from the library
The Advertising UI library is now accessible as a private NPM package on GitHub, making it effortless to integrate into any of our Nuxt projects that require Display Advertising. By having the ad configuration in the consuming project, our teams have increased autonomy and can experience a more efficient CI/CD process. Although the library is still in its early stages, developers have the opportunity to collaborate and enhance its functionality.
Final thoughts
The new funda search experience comes with an improved advertising library that provides better flexibility, control and reusability. The Advertising UI library exposes commands and options for project-specific use cases. By moving the advertising implementation outside of the monolith and making it a library, other projects that require display advertising can also benefit from it.
Additionally, promoting team autonomy by allowing each project to manage its own project-specific configuration adds to the flexibility of the system. With these enhancements, the new Advertising UI library at funda is set to deliver a more effective and efficient way of managing and displaying ads across multiple projects.
See also: Game changer: how we went from 85 to 5 core data dashboards
